Vector Q
Vector Q User Manual. iOS Version
1.1 Raster to Vector
1.2 Color Curves
1.3 Variable Strokes
2. Workspace. The Vectorizer and the Editor
• Zooming and Panning
• Text Fields and Sliders
• Panels
• Global
• Colors
• Edges
• Background
• Generator
• Cleaning
• Triangles
• Lines
• Colors
• Vignette
4.1 Toolbox
4.2 Panels
4.2.1. Edit
4.2.2. Tool Properties
• Selection
• Nodes
• Pen
• Brush
• Gradient
• Stroke
• Shapes
• Text
• Images
• Eraser
• Transform
• Panning
• Zoom
4.2.3. Layers
4.2.4. Appearence
• Fill
• Stroke
• FX
• Palette
• Palette Manager
4.3 Groups
4.4 Mask
4.5 Snap
4.6 Guides
1. Introduction
Vector Q is a powerful app for creating and editing vector images. The smart filters vectorize pictures in real time, from black and white drawings to unlimited colors paintings and pictures with color curves. The color curves are a new way of painting with colors that follow the contours of the shapes.
RASTER TO VECTOR
Images can take a new form by converting bitmaps into vectors. Vector Q offers a number of controls for customizing the conversion and some predefined styles for quick vectorizations.

COLOR CURVES
Color curves place several swatches in the contours of a shape or a stroke. The color curves create organic transitions between colors.
VARIABLE STROKES
Changing the thickness of a stroke has never been so easy. Strokes are not attach to a unique weight anymore. One stroke can have several weight and color values along its path . There are many possibilities to play with.
2. Workspace. The Vectorizer and the Editor
Vector Q has two differents modes, one for vectorizing pictures and another one for editing vectorizations.
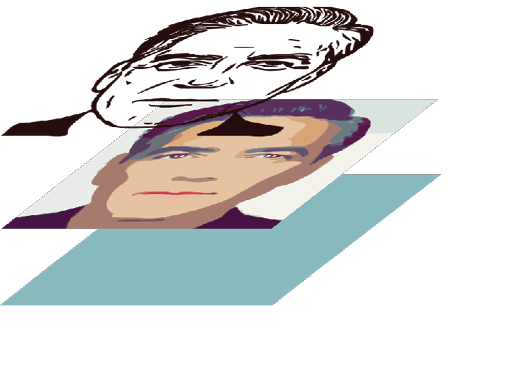
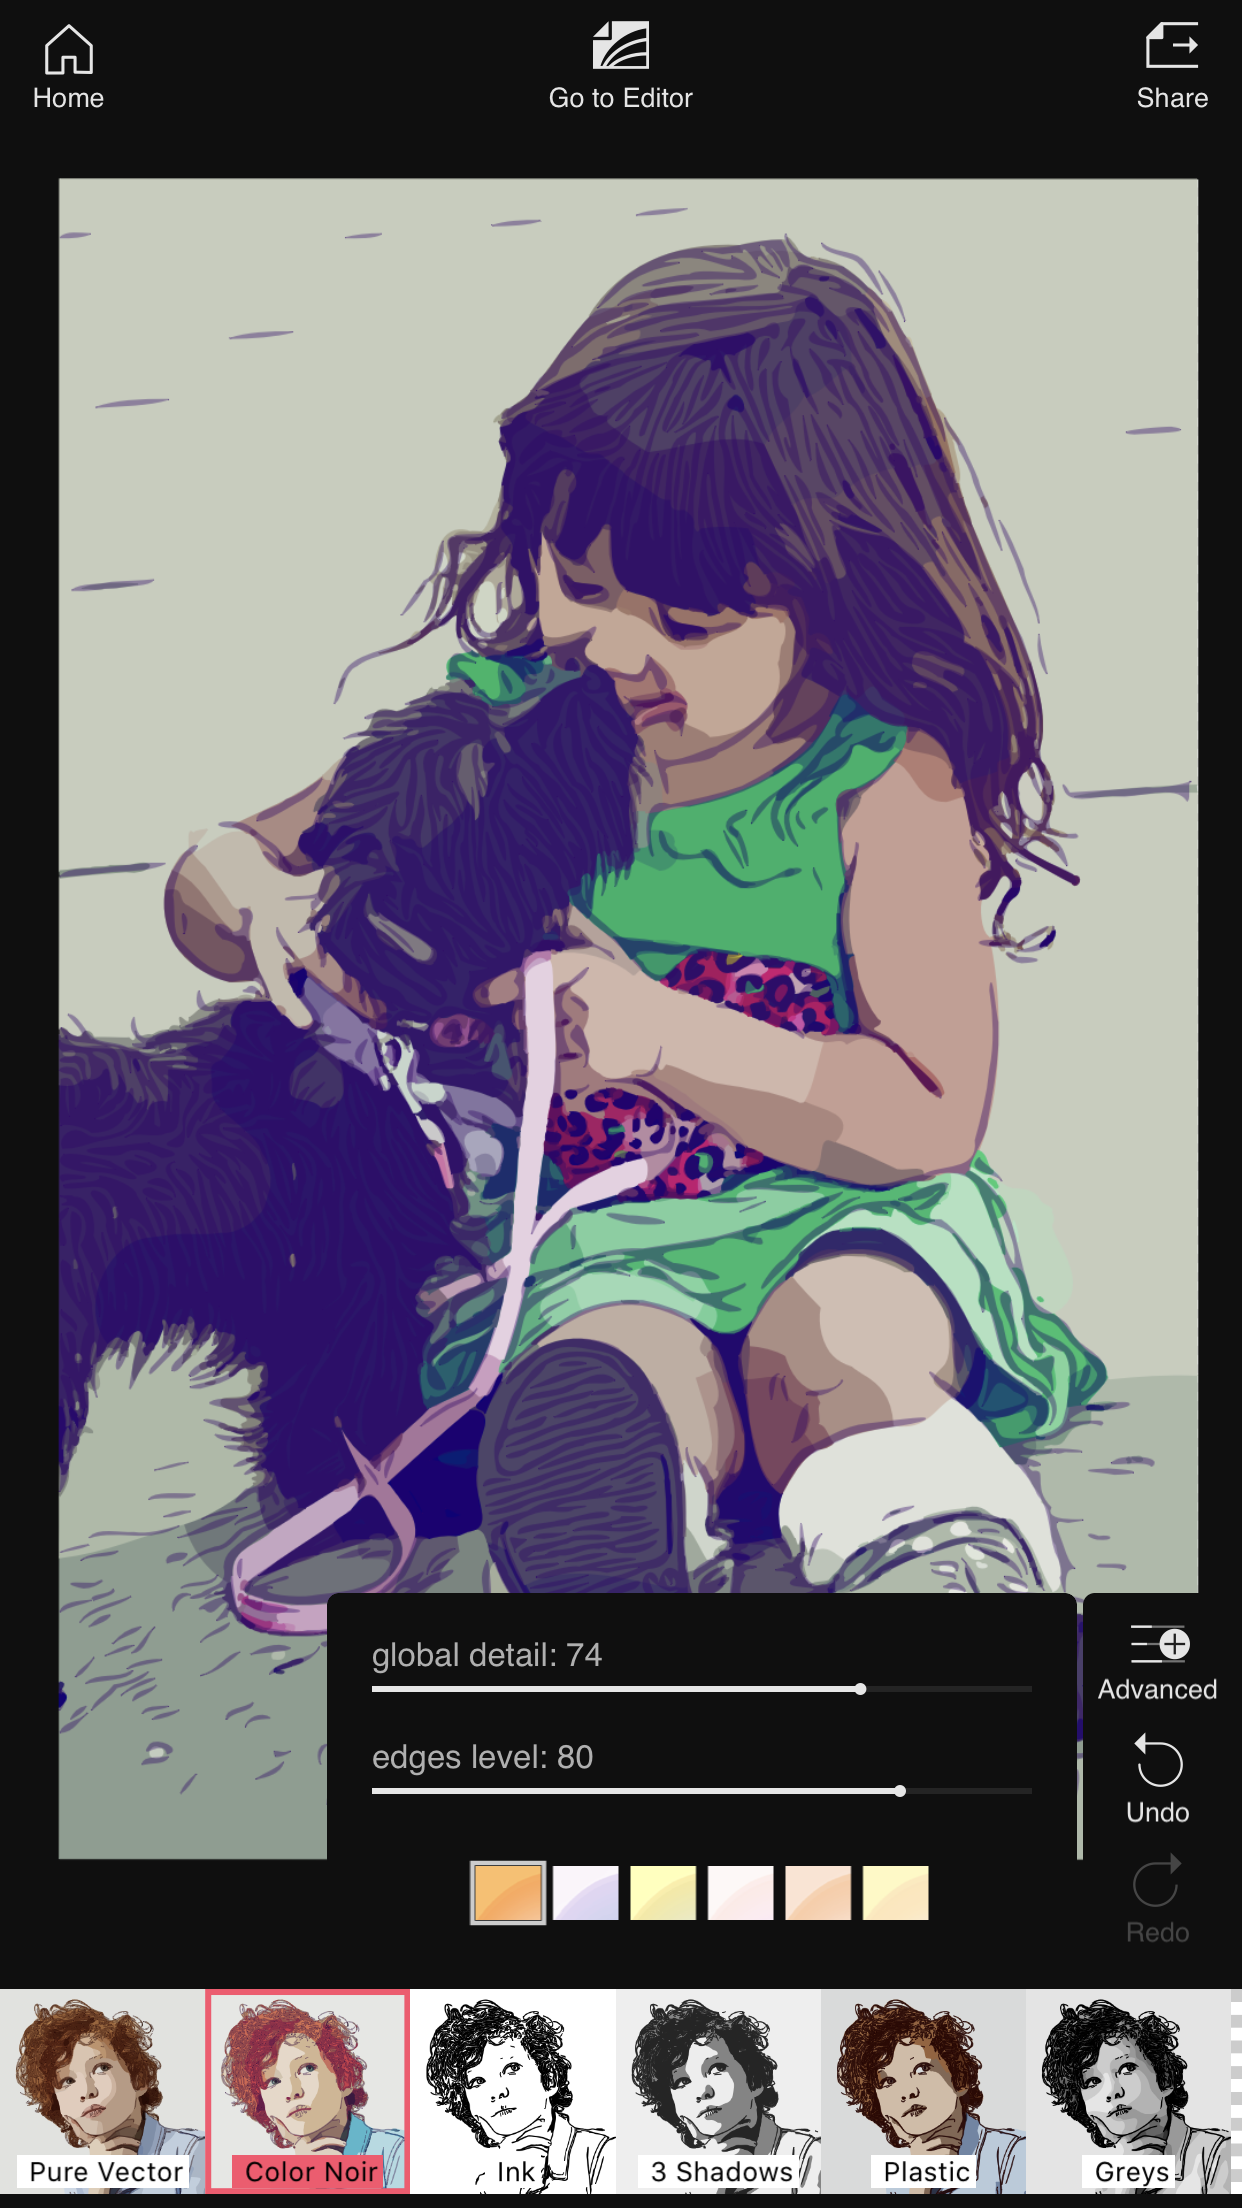 Vectorizer workspace
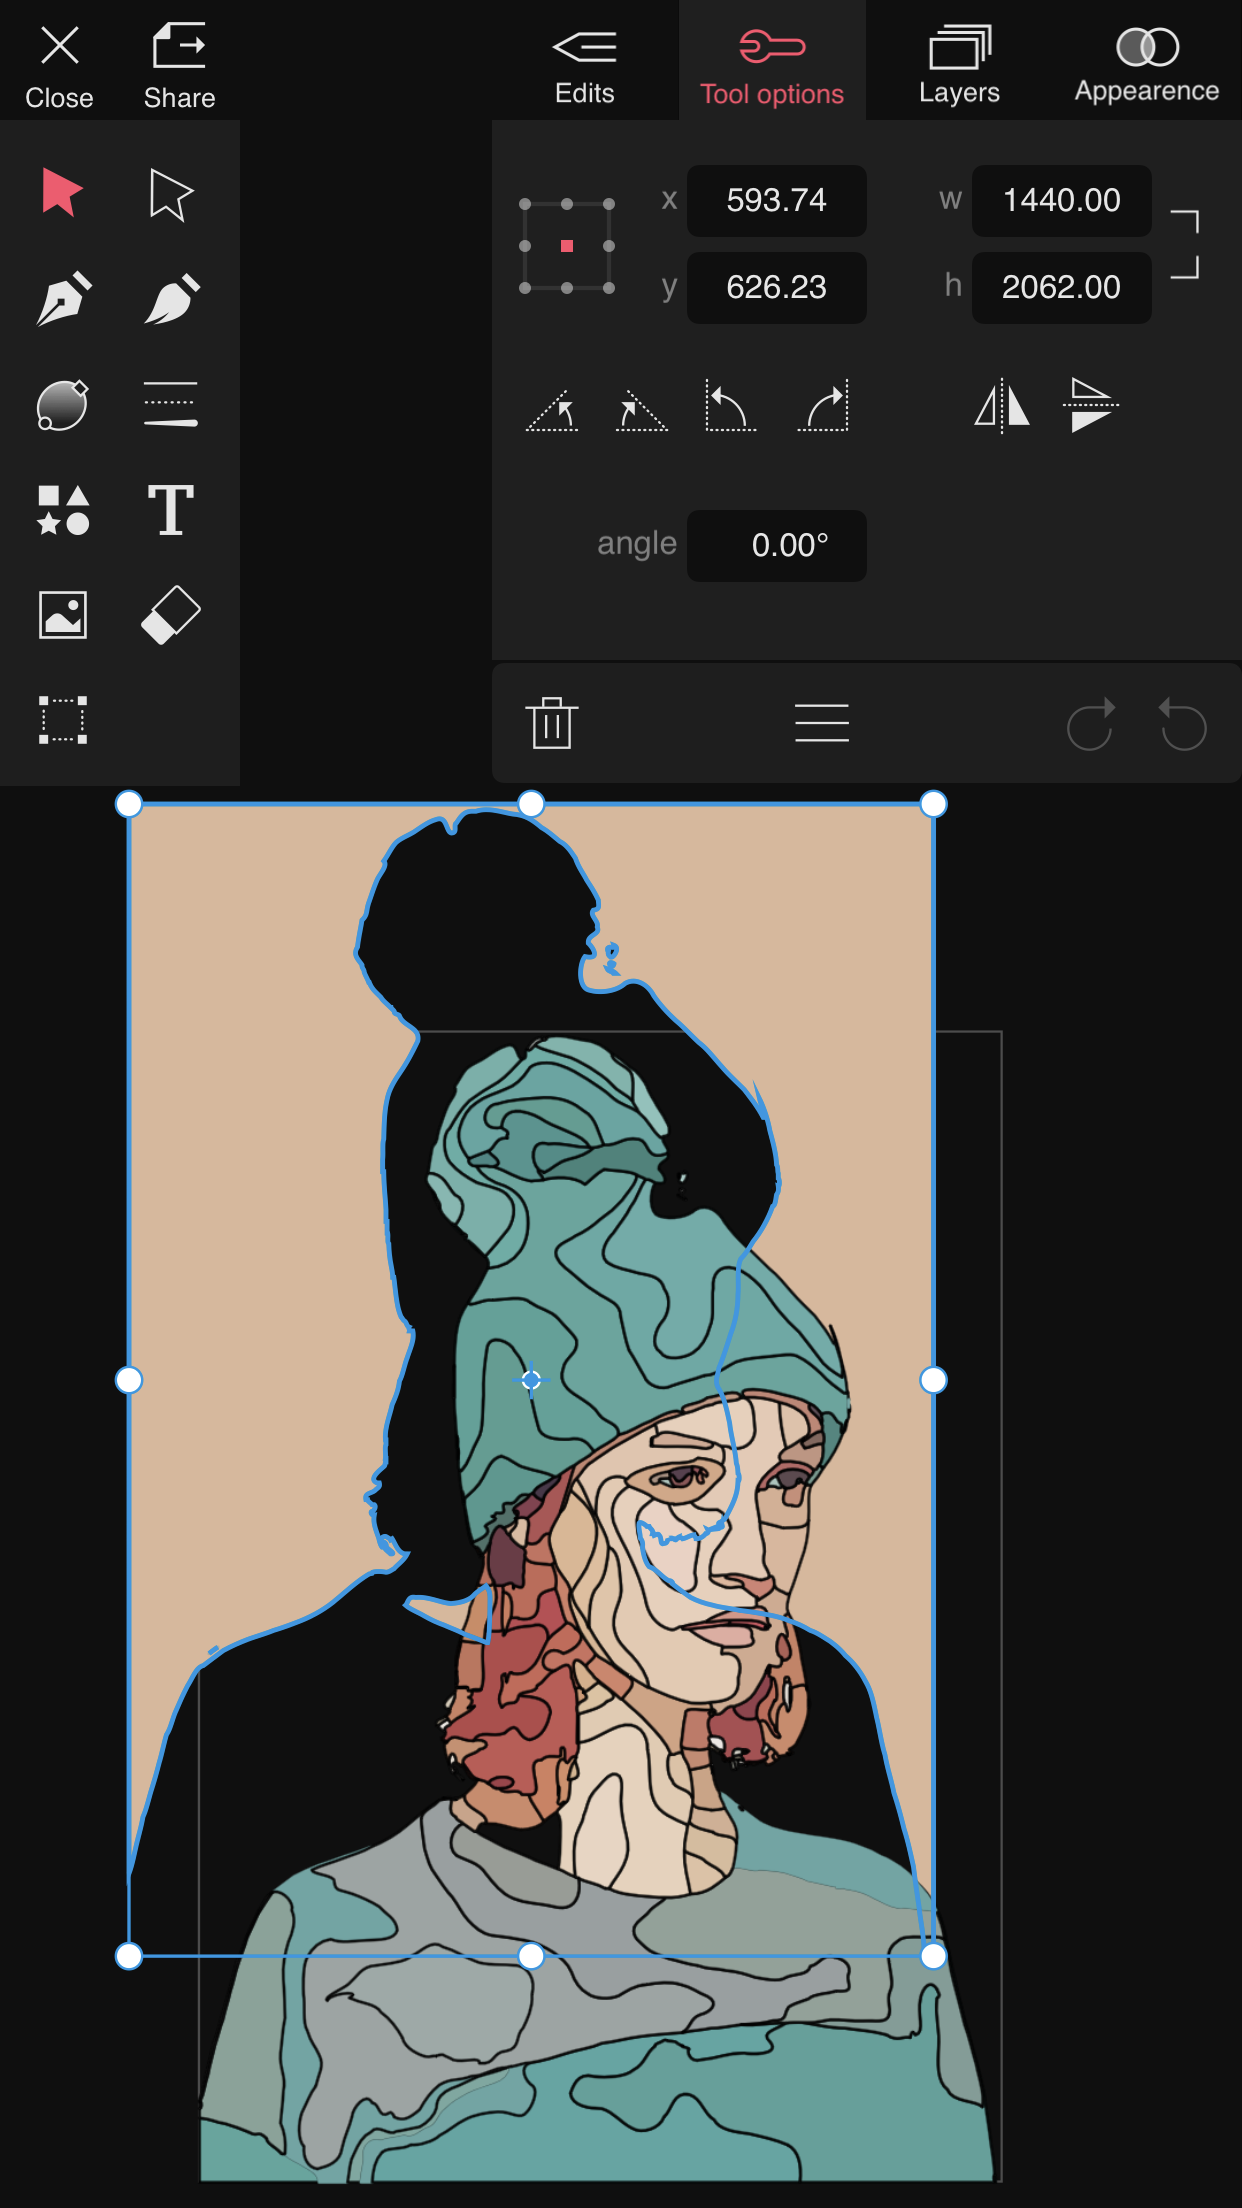 Editor workspace
If you IMPORT a picture Vector Q will atomatically open the vectorizer workspace. If you create a drawing from scratch with the button NEW, Vector Q will open the editor workspace.
Vectorizer workspace has two User Interfaces modes, smart and advanced, to enable advanced mode go to Vector Q settings in main view. Once advanced mode is enabled you can switch from mode to another inside vectorizer view.
After vectorizing a picture you will probably want to edit it further, use the ‘Go to Editor’ button  to move to the editor workspace. In the vectorizer mode you will not be able to move, delete, add shapes or change individual colors, this editing has to be made in the editor mode.
2.1. Controls
ZOOM AND PANNING
Use two fingers to zoom and pan. Pinch to zoom, swype for panning.
In Vectorizer mode, single tap on canvas to reset the zoom. Drag on screen to select an area to zoom in.
TEXT FIELDS AND SLIDERS
The number values in all the panels change if you tap and drag up/down, or left/rigth (but not diagonal dragging!).
In numbers with decimal units, you can either change the integer or the decimal value, depending on where you start the dragging movement.

Single tap to enable typing. In text-input panel, at left, right and bottom you can find a draggable area to change the text value, left and right for integer part and bottom for decimals.
PANELS
A panel can be hidden by clicking on its title.
Press the Tab key for hiding/showing the toolbar and all the panels. If these are hidden you can still use them. Place the cursor close to the right side of the screen for temporarily showing the panels, or the left side for showing the toolbox.
2.2. Documents
There are 3 default proportions for the size of a document in the welcome window (square, portrait and landscape) plus a custom size option.
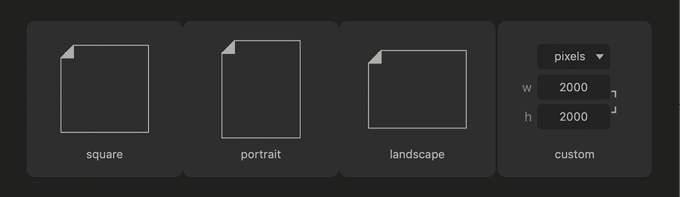
Document format
The vectorizer opens bitmap files (png, jpg, tiff), while vector files are opened in the drawing editor. Projects created in Vector Q (vqe) are vector files that can be saved either as drawings (D)—in the editor— or vectorized files (V)—in the vectorizer. The small letter close to the document name in the welcome window stands for the type of file.
Open Documents
Vector Q opens documents created in the app but also other file formats. The welcome window includes quick access to the most recent documents. If you want to open a file that is not on this list, use the 'Import' button in the custom projects gallery.
3. Vectorizer
A vectorized image is made up of 3 layers, background, colors and edges. Any of these parts can be modified or hidden so the effects are applied to one or several layers.
To adjust the vectorization you have two panels, VECTORIZER and MODIFIERS, plus the PRESETS panel for importing/exporting predefined adjustments. The CROP panel, at the bottom part, is used for cropping the original image.
In the Vectorizer you are not allowed to change shapes manually, in order to make further modifications you have to send the vector image to the Editor.
By clicking on ‘Send to Editor’ you will create a new drawing with as many layers as there are in the Vectorizer.
3.1. Vectorizer Settings Panel
The top part of the panel is dedicated to the overall appearance of the image. These options define how colors and shapes adapt to the new format. It includes two controllers, detail and style. They define how detailed the new image will be, and the texture created by vectors.
COLORS
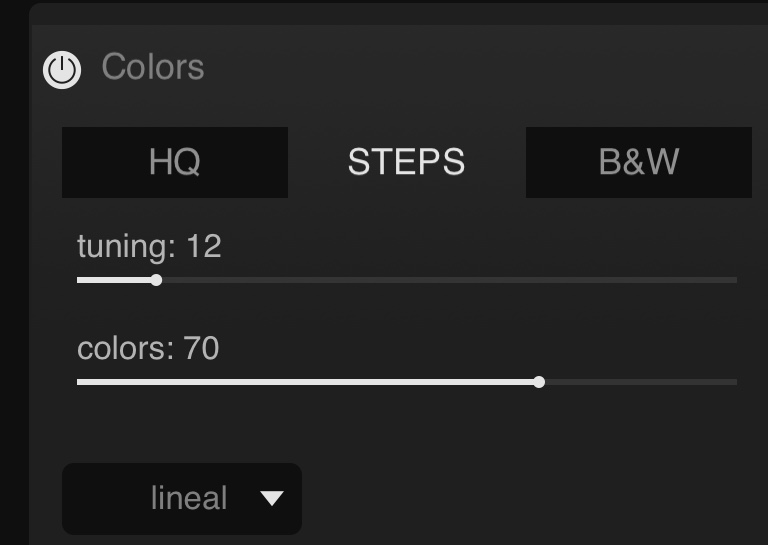
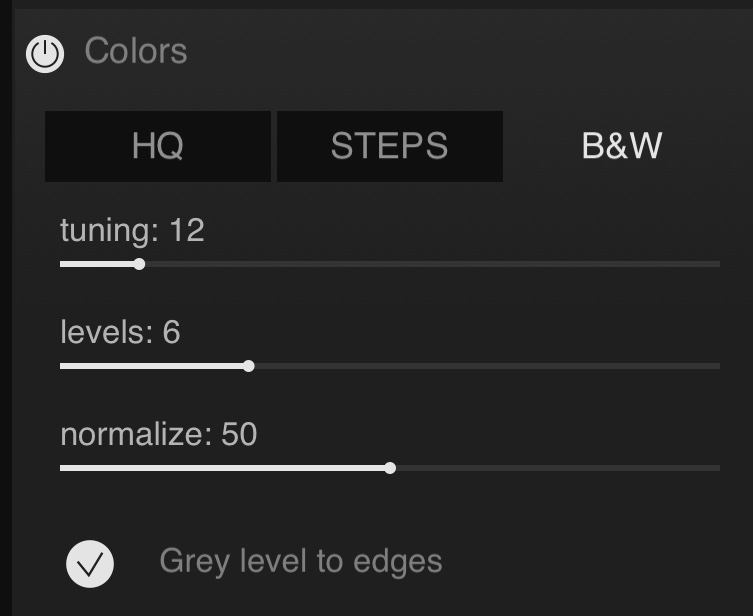
There are three color conversion modes, HQ, STEPS, and B&W.
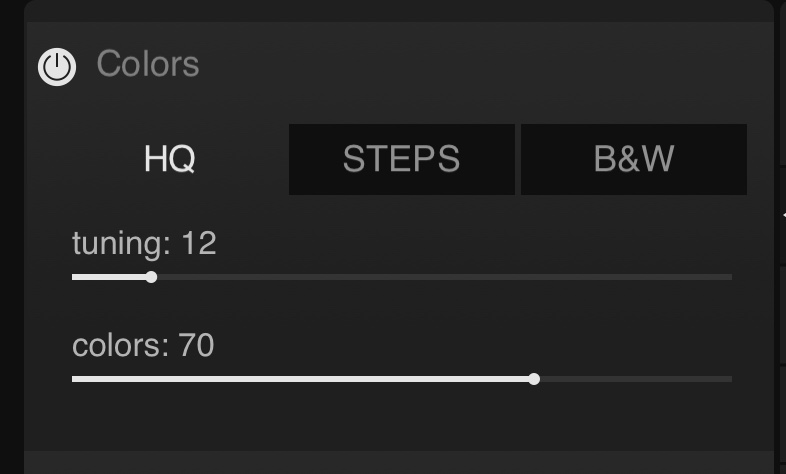
HQ uses unlimited solid colors, this is the method for a higher accuracy. It includes a color controller, the higher the value the more colors will be included.
STEPS force the algorithm to work with color limitations, the output is less realistic. There are three variations for this vectorization mode, adaptive, AI, and lineal.
In the adaptive method the vectorizing algorithm adapts to the original image. The AI method uses deep learning techniques for selecting the most appropriate colors for the image. And the lineal mode identifies the most common colors used in the image.
B&W processes the image in gray tones. Levels is used to select the number of gray shades from 2 up to 16. Normalize increases the contrast between the selected levels.
Tip: This is the perfect vectorization mode to combine with the ‘color replace’ effect. You just have to use the same number for gray levels as the colors in the replace palette.
In the STEPS and B&W modes the circular palette will display the colors in the image, click on it to show the color manager where you can save the current palette. Colors in the image can’t be modified individually here, but you can use the option ‘replace’ in modifiers/colors or send the image to the Editor.
EDGES
This panel controls the dark shapes that serve as contours in the image. The level value gives instructions to the vectorizing algorithm so the the edges are more or less prominent, with the threshold value you can add or remove shadows.
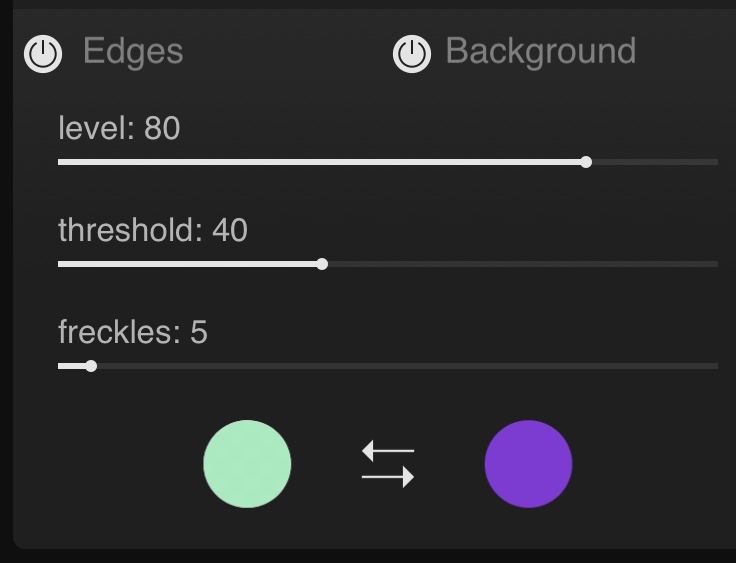
The color for the edges in the image is customizable. You can either use just one solid color or a two-color gradient. Click on the circular color sample to open the color editor.
BACK
If the vectors in the new image do not fill the whole document you will be able to see the background. The back color sample allows you to select a custom value for the background color. You can either use just one solid color or a two-color gradient.
The reverse button swaps edges and background color in one click. Turning off the ‘colors’ section also reveals the background, you can turn off ‘back’ to get a transparent background. If you turn off ‘colors’ and ‘edges’ you get an empty image with a simple background.
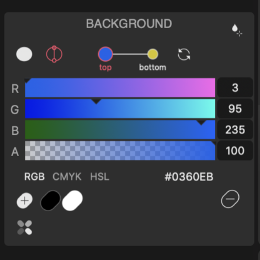
Color panel
With the color panel you can switch between a solid color and a linear gradient. Select the top or bottom colors for editing gradients, and use the ‘reverse’ button in case you want to swap top and bottom positions.
Only vertical gradients are allowed in this color panel, for more complex gradients you have to send the current vectorization to the Editor.
Tip: By simply turning off the colors section and combining gradient edges with gradient background you can get gorgeous results.
3.2. Modifiers
Once you have defined the general appearance for the new vector image you can refine the result by using the modifiers.
Generator: Get random values for the vectorization panel, the modifiers panel or both of them.
Cleaning: ‘Size’ deletes small shapes created in the vectorization, the size value sets the limit for a shape to be deleted. And ‘luma’ deletes shapes from the vectorization using a color parameter as a threshold, this parameter can be white, black, red, green or blue.
Triangles: Force shapes to straight lines. Shorter lines keep shapes similar to the original, larger lines fit shapes into polygons.
Lines: Add contours to the shapes. It is possible to define the weight and color for these strokes.
Colors: Apply a color filter to the image. There are several options, analog, duotone, greyscale, pattern and replace.
The analog and duotone modes include a list of predefined combinations you can choose from. In duotone you can select dark and light color manually. ‘Pattern’ applies colors from six predefined palettes. Replace switch the original color with a color from a custom palette. New palettes can be imported or created randomly. The random button generates a palette with the actual number of colors. This effect can be applied either to color shapes only or to shapes and edges.
Vignette: Add a vignette effect to your picture. Hue, diffusion, and saturation can be customized. This modifier is only available for the STEPS color vectorization method.
3.3. Presets
It is possible to save your custom settings in the preset list.
If you want to create a new preset, you just need to define your vector style and press the New Preset button in the panel. Select the folder for saving your presets and it will inmediately appear on the list. Double-click on the name if you want to change it.
Use the star button on the the preset layer to add it to your favorites. A circle mark below the star button identifies the built-in presets. You cannot delete or overwrite these built-in presets.
If you decide to change some characteristics in a custom preset you can overwrite the saved information using the first button in the middle of the panel. It is also possible to import presets you have saved before or export them to a new folder so you can save them for later.
If you want to clean up the presets list you can delete the custom presets you are not going to use.
3.4. Crop
The crop panel includes a preview of the original picture. Using the corner nodes you can define new limits for the picture and use that selection for the vectorization. It is possible to return to the original size using the Reset button. And you can use the same value for both height and width with the Square button.
4. Editor
4.1. Toolbox

Selection [V]: select one or several objects and edit them. Tap on an empty point in the workspace and drag until you cover all the elements in want to select. Only the objects completely included in the drawn area will be selected. Tap on Selection tool icon to show 2 posible subtools, normal selection and multiple selection (the arrow with a +) . Multiple selection allows you to add or remove objects from the current selection.

Nodes [A]: select nodes in one or several paths and edit them. Tap and drag for selecting nodes.Tap on Nodes tool icon to show 2 posible subtools, normal node selection and multiple node selection (the arrow with a +) . Multiple node selection allows you to add or remove nodes from the current selection.

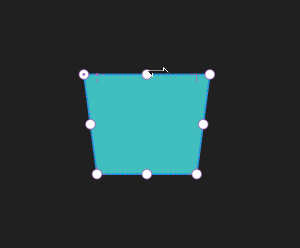
Pen [P]: create vector shapes in a controlled manner. Tap and drag for creating curved lines. Tap on last node for finishing an open path or tap on the first node for closing the shape.

Brush [N]: draw by following the movement of your hand. Nodes are automatically added to the paths.

Gradient and Color Curves [G]: customize gradients and color curves. Click and drag the color nodes to a new position. You can also change the color samples, delete them, and add new ones.

Stroke [S]: modify the appearance of the strokes. They can adopt three different styles, solid, dashed or variable. The weight handlers in the workspace allow you to change their appearance.

Shapes [M]: create predefined geometric shapes. Click and drag for drawing a new shape in the workspace.

Text [T]: add text strings. You can create a new text line with one click. Choose a place in the workspace and type your text.

Images [I]: include pictures in the document. Click and drag for deciding the size and position of the picture.

Eraser [E]: substract parts of custom shapes and paths. The eraser will have no effect in predefined objects (text, pictures or predefined shapes).

Transformation [F]: distort lines, shapes and blocks of text. Use the control nodes for transforming the original object.
4.2. Panels
4.2.1. EDIT
OBJECT
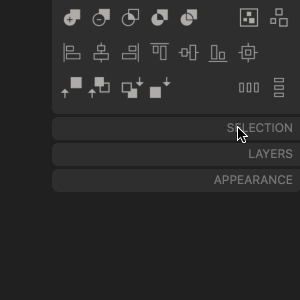
It is possible to combine, align, position, distribute and group objects.
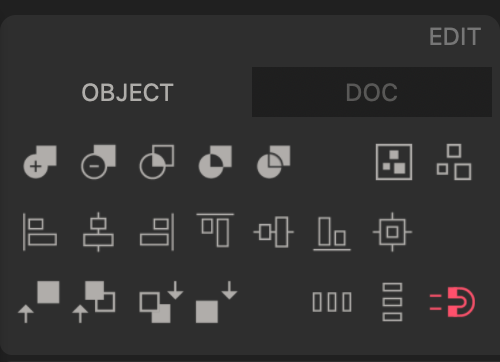
Objects can be combined in different ways. Select two or more objects and choose between the available options, merge, substract, intersect, exclude, or divide.
Selected objects and nodes can also be aligned. If there is just one object in the selection, it will be aligned to the document.
Objects can change their absolute position, sending them to the foreground or the background. They can change their relative position as well, moving forward or backward.
Grouping objects can be helpful for organizing the composition. You can group elements and avoid unintended changes. → Go to groups section
Objects and nodes can be distributed in an horizontal or vertical axis.
The magnet button opens the Snap Options panel. → Go to snap section
DOC
The Document panel includes options for customizing the workspace and your document view.
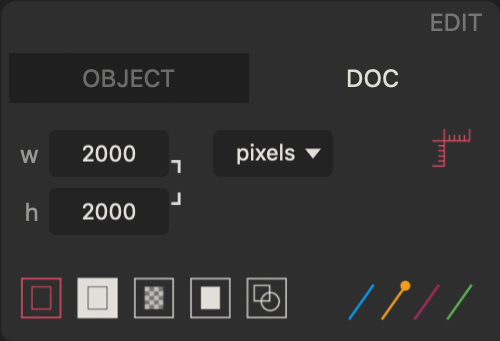
You can change the appearance of the document and the workspace in this panel. Get access to the size of the document using the height and width fields. Click on the bracket lines that connect both measures if you want to lock proportions. Available units are pixels, inches and centimeters.
There are five different view modes for the document. They combine the background color for the document and the workspace in different ways. The document can display a dark, white or transparent background. For the workspace, you can chose between dark or white. There is an extra option for only seeing the contours of the elements in the workspace.
Use the ‘rulers’ button to show/hide rulers.
Depending on the colors you are using in the composition you may want to change the default color for selecting and editing elements. There are four options available.
4.2.2. TOOL PROPERTIES
Most editing work in Vector Q can be done directly on canvas. Tool panels add aditional options and quick access to their properties.
SELECTION
You can transform elements in the workspace with the selection tool. Use different coordinates for repositioning objects or changing the width and height of selected elements. Click on the brackets if you want to connect proportions.
The rotation buttons change the orientation of the selection (45° or 90°). If you want to use a custom angle use the text field below. You can also rotate elements by simply using the double arrow that appears above your selection.
The ‘flip’ buttons create a mirrored version of the original selection.
With this tool you can also add guides to the document.
→ Go to guides section
NODES
There are two types of nodes, the node with connected handlers and the node with independent handlers. Switch from one to the other by clicking on the node selector. If you want to delete two handlers you need to select the node first and then click on the button ‘Independent Handlers’ + CMD.
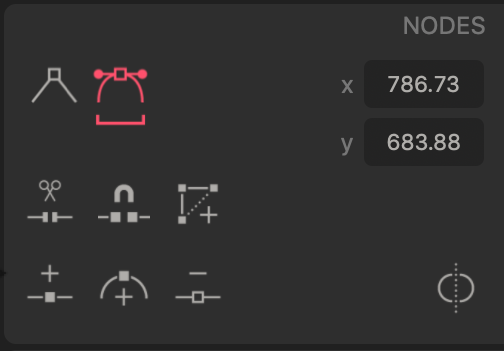
There are some useful shortcuts for editing paths:
Tap on a path to add a new node.
Click and Drag the path to modify it.
Add a new node in the middle of a segment by selecting two consecutive nodes and pressing the ‘Add Node’ button. Selected nodes can be deleted using the panel 'trash' button . The ‘Add Curve’ button will create a semicircle between two nodes.
If you want to connect two or more paths, select them and click on ‘Join Paths’. Cut a path with the ‘Split Path’ button, and connect the initial and final nodes in a path with the ‘Close Path’ button.
Paths can turned into mirrored shapes with the ‘Mirror’ button. ‘Mirror’ is the perfect tool for editing symmetric paths. Only simple paths can become mirrored paths, this option is not available for shapes and compound paths.
PEN
You can use the manual or the automatic pen. The manual pen creates straight lines between nodes, which can be curves if you click and drag the pen. The automatic pen creates smooth transitions between nodes.
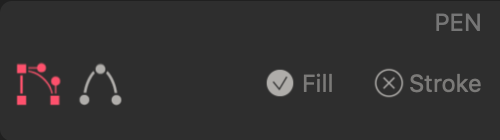
To end a open path click in the last node . To end a closed path click in the first node.
For closed shapes you can decide if you want them to have fill and/or stroke. Activate/deactivate these options in the panel.
BRUSH
There are three different types of brushes, marker, pressure brush, and pencil. The marker paints by creating outlined strokes, which means it is not possible to modify the size of the strokes after painting.
The pressure brush identifies the speed of your hand, applying different thickness values along the path. The faster your hands moves the thicker the stroke is.
The pencil imitates hand-drawing. If the end and the start point are close they will automatically join and create a closed shape. It is possible to create complex paths from simple parts.
There are two types of terminals for the strokes, round and square. Choose the one that better fits your needs.
Change the size of the stroke if you want to create thinner or thicker strokes. The brush can create fluid or sharp paths depending on the smooth value in the panel.
GRADIENT & COLOR CURVES
The appearance of gradients and color curves can be edited in this panel. Click and drag the color nodes if you want to change their position or use the x-stop field. Select a color node and change the values in the color panel if you want to use a different swatch.
Tap in a Path to add a color node.
If you want a uniform color distribution click in ‘Organize Colors’. ‘Reverse Gradient’ mirrors the direction of the gradient.
There are extra settings for the linear and radial gradients, you can change the angle and the size. The magnet icon limits the movement of color nodes to regular increments.
Using ‘comp variable’, linear and radial gradients can use non-linear color transitions and avoid artifacts, use 0.0 for a classic gradient and increase it up to 1.0 for getting a more compact gradient.
Two color curves modes are available for Text on Path, a continuous transition between colors or a discrete transition.
STROKE
You can edit the properties of strokes. There are three styles available for the strokes, solid, dashed, and variable.
You can change the weight of strokes, and decide about the appearance of corners (round, square, or biselated) and terminals (round, square, or flat).
For the dashed stroke, you can also indicate the length of dashes and the space between them.
Variable strokes use different weights in one path. Select a variation node and type a custom value or drag the weight handlers on canvas. You can also customize the transition between weights. Switch on/off the icon eye if you want to show/hide the transition handlers on canvas. You can also use the in/out text fields for editing transitions.
If you want to chang the position of a variation node, select and move the node or use the position value in the panel. If the magnet is activated you will move the variation node in regular increments.
Tap in a Path to add a weight node.
Strokes can be converted to shapes using the ‘Outline Stroke’ button.
SHAPES
There are up to six standard shapes you can choose from, square, circle, polygon, star, spiral, and arrow. All of them can be customized and include control nodes for fast editing.
In the spiral you can change the length, use the start and end text fields or move the control nodes in the workspace. You can also change the size of the spiral and modify the squareness of the path. There are three types of spirals. The polygonal spiral includes an extra property for the steps in the shape, this value changes the rotation angle and the number of segments.
The icon in the top right corner of the panel activates/deactivates square proportions for the shape.
In order to be able to edit the nodes of the shape you need to convert predefined shapes into paths, use the panel button ‘Shape into Path’.
Spiral shape in action
TEXT
Click in any place of the workspace for creating a new text element. Type a text and select the typeface and style you want to use.
Use the ‘Text on Path’ button if you want to convert the baseline into a path. The baseline line will be then editable using the node selection tool. Text can also adapt to an existing path selecting this option in the menu.
When the text is adapted to a path you can mirror the position and use a perspective distortion for the characters.
The tracking value in the panel modifies the space between characters. If you want to convert the text into contours use the button included at the bottom right corner of the panel.
IMAGES
Click or Click and Drag for placing a bitmap image in the workspace. The file will inmediately be listed in the images panel so you can use it again. Dragging the cursor on canvas will add another instance of the current selected picture.
Pictures are created in the workspace with its original aspect ratio, you can then resize them to any other dimensions with the Selection tool.
Use the panel buttons to add and delete pictures, deleting a picture from the list will also delete all of the instances in the workspace.
Images placed on canvas can be vectorized in place, keeping their current properties. There is a Cancel button in the Vectorizer so you can always return to the original bitmap image.
Pictures can be distorted with the Transformation tool, and they can also include an outline stroke, which can be solid or variable in colors and weight.
Inserting an image, applying perspective and vectorizing it
ERASER
The eraser deletes parts of vector shapes and strokes. If you want to delete complete elements you can select them and use the DELETE key.
The eraser can be round or square and you can also customize the size and softness of the tool.
TRANSFORM
Select one element and use the control nodes on canvas. Corner nodes are for free transformation and side nodes for skewing (or perspective if you press CMD).

Only drag
Drag + CMD
You can switch between two types of transformation, a simple distortion or an 3D perspective.
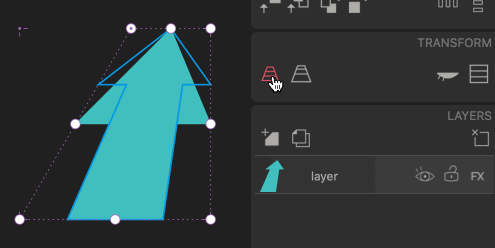
All the elements that have been transformed can returned to their original shape using the ‘Restore’ button.
This tool don't apply to groups and text on paths.
4.2.3. LAYERS
This panel can help you to organize elements in the document. You can add, duplicate, and delete layers.
Select a layer and move it to a different position if you want to reorganize the pile. Double click on the name and type a new text if you want to change it.
Swith on and off the eye icon to show/hide the layer content. You can lock/ unlock layers with the padlock icon. The FX button shows the opacity and blur effects you can apply to the layer.
4.2.4. APPEARANCE
The main purpose of the appearance panel is to edit the fill and stroke colors. You can change a solid color while using any other tool but you will need to use the Gradient Tool to select individual colors in a gradient or the nodes in a color curve.
FILL
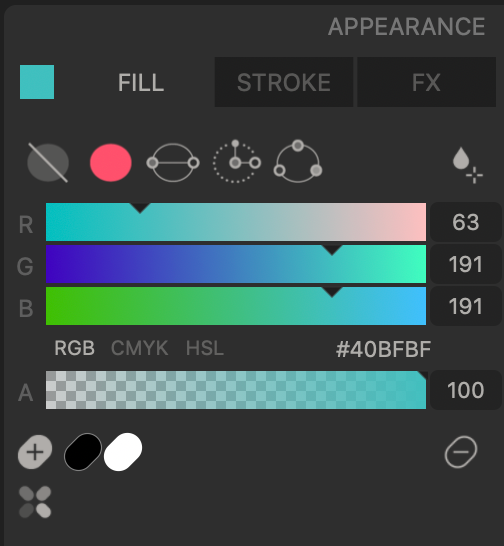
The fill panel includes five types of fill, no-fill, solid color, linear gradient, radial gradient, and color curves.

If you want to modify a gradient or a color curve you need to select the gradient button in the toolbox first, then you can access the colors in a gradient and in a color curve.
You can use different color modes, RGB, CMYK, or HSL. If you click on the hex color value you can copy and edit colors in this format.
There is also a color picker  that selects colors used on canvas. You can swith on and off this button. The Color Picker also turns off by pressing ESC.
Using the Color Picker + OPTION will select the color and add a new swatch to the palette without turning off the picker, so you can easily create a palette from your drawing.
STROKE
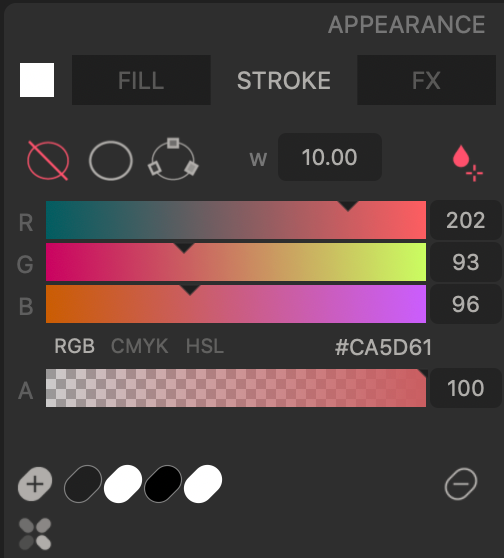
There are three options, no stroke, solid stroke, and color curves.
The fill and stroke panels share most of the options. Color curves for strokes are edited in the same way as colors curves for fills, using the Gradient tool.
This panel also includes a textbox with the weight of the stroke. You can change this value here or use the Stroke Tool to modify the weight on canvas, using the ‘weight handler’.
FX
Elements can change their opacity, which affects fill and stroke.
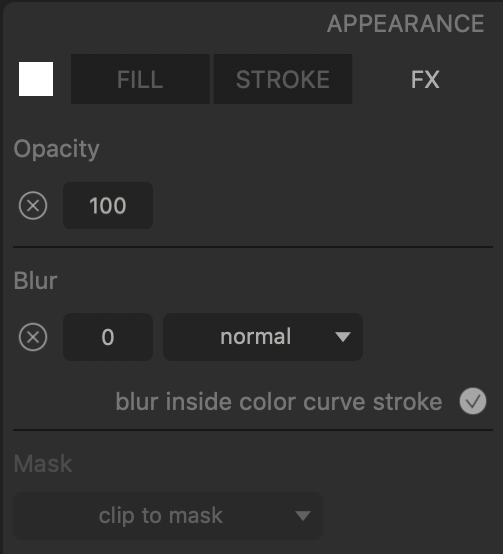
The blur effect has 3 modes, normal, noise and inside noise. Normal is the estandard gaussian blur. Noise is a lo-fi blur. Inside noise is similar to noise but it's only applied to the area inside the contours of elements.
Color curve strokes can have a blur effect. Colored strokes sometimes create overlaps in corners, applying a blur effect can smooth the transitions. Bear in mind that strokes with complete overlaps may not look good.
The mask mode can be edited in this panel. → Go to mask section
Palette
It is possible to create your own color palette by adding new swatches. Select a swatch and press the Delete Swatch button if you want to remove an existing color.
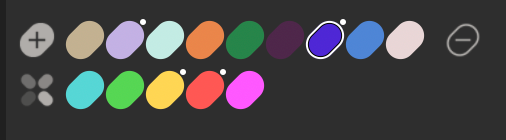
Color swatches can be global. Elements using global colors are linked to them. If you modify a global color you will change all the elements using it. Make a color global by Click+CMD in the selected swatch, global colors are tagged with a little dot. Edit a global color by selecting the swatch and using Click+CONTROL. Deleting a global color will unlink all the elements using it.
Color palettes are attached to the saved document. They can be exported and imported using the File menu. The File menu also includes and option for Copy and Paste color palettes between documents.
Use the palette button  to open the palette manager.
Palette Manager
There are some predefined color palettes in Vector Q. Select one and click on ‘replace colors’ to use that palette in your document. You can then add or delete colors in the appearance panel and save the new palette using the button ‘save palette’ in the manager. You can also rename your own palettes, edit the text with a double click on the name.
4.3. GROUPS
Group/ungroup elements using the buttons  in the EDIT panel.
If you want to edit an existing group double click on it, group elements are then editable and the group hierarchy panel appears on canvas. You can use this panel to navigate through nested groups.
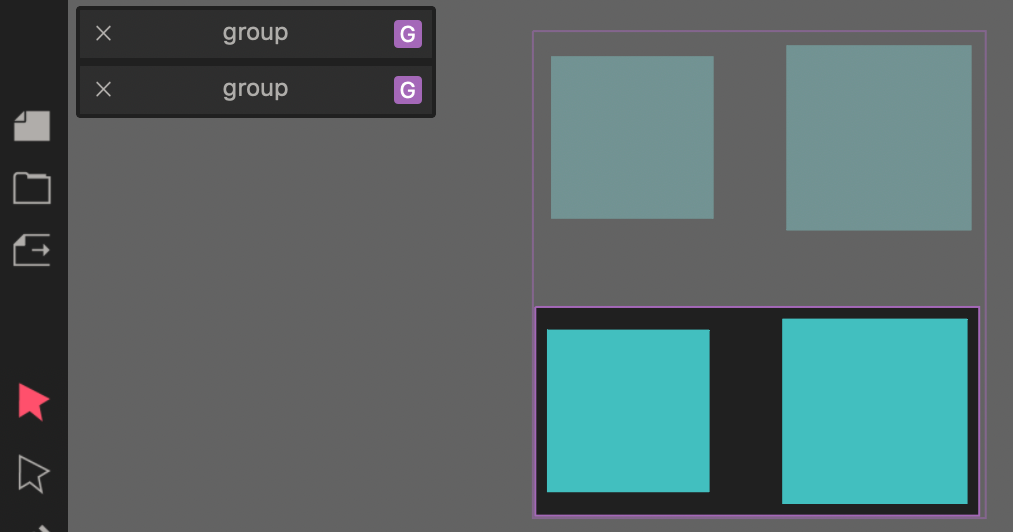
Click outside the group to close the current editable group, or navigate to the parent group.
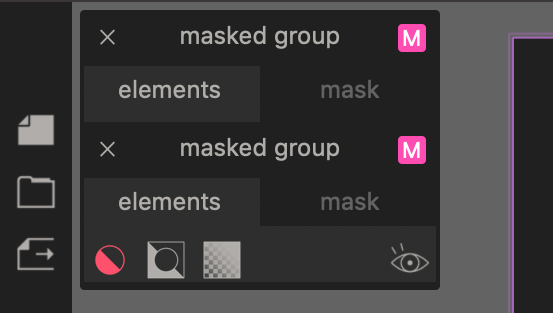
4.4. MASK
A mask is a set of elements (the ‘masked elements’) whose visibility is restricted or defined by another set of elements (the ‘mask elements’).
Masking elements is as easy as making a group, the difference is that the top element from the selection will be used as the ‘mask element’. You can use any single element as a mask, a path, a shape, a piece of text, a picture, a group (a group is considered as a single element here).
If you want to mask something use the menu/submenu at bottom,
After the mask is created you can add more elements to the ‘mask element’ or to the ‘masked elements’, so the single object limitation no longer exists.
If you want to edit an existing mask double click on it, mask elements are then editable and a mask hierarchy panel appears on canvas, you can use this panel to navigate through nested masks/groups.
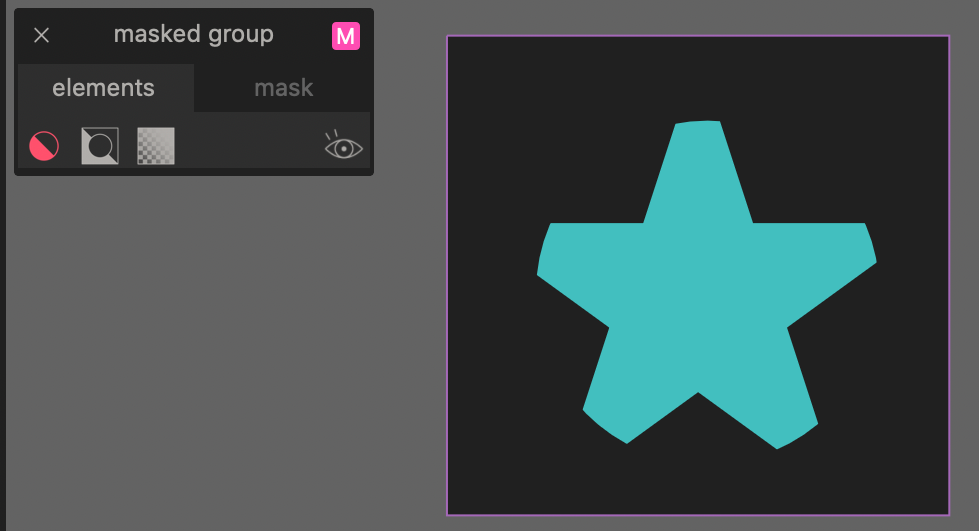
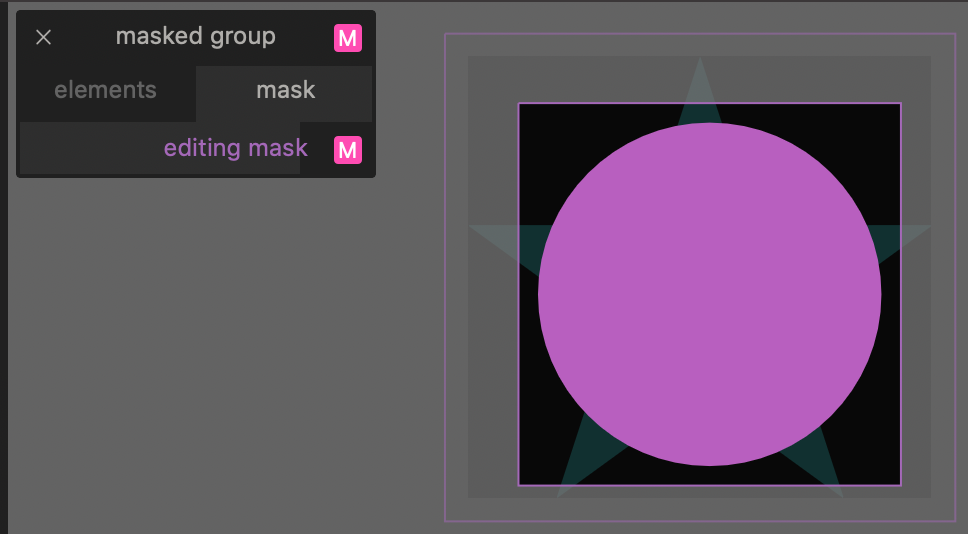
In the mask panel you can switch between ‘elements’ and ‘mask’, for editing the ‘masked elements’ and the ‘mask elements’ respectively. In the ‘elements’ section you can switch between three mask modes:
Clip to mask: masked elements are clipped to the mask solid parts.
Clip to negative mask: masked elements clip the parts that overlap with the mask shape.
Luminance: white color in the mask is considered as a solid color, and black is completely transparent, masked elements are also clipped to the mask shape.
With the eye button you can temporarily disable a mask so you can comfortably edit the ‘masked elements’. In the ‘mask’ section you can edit the current mask elements and add more.
Click outside the mask to close the current editable mask, or navigate to parent mask.
Nested masks are possible, but make sure you know how a simple mask works before nesting masks. Handling nested masks is quite complex.
4.5. SNAP
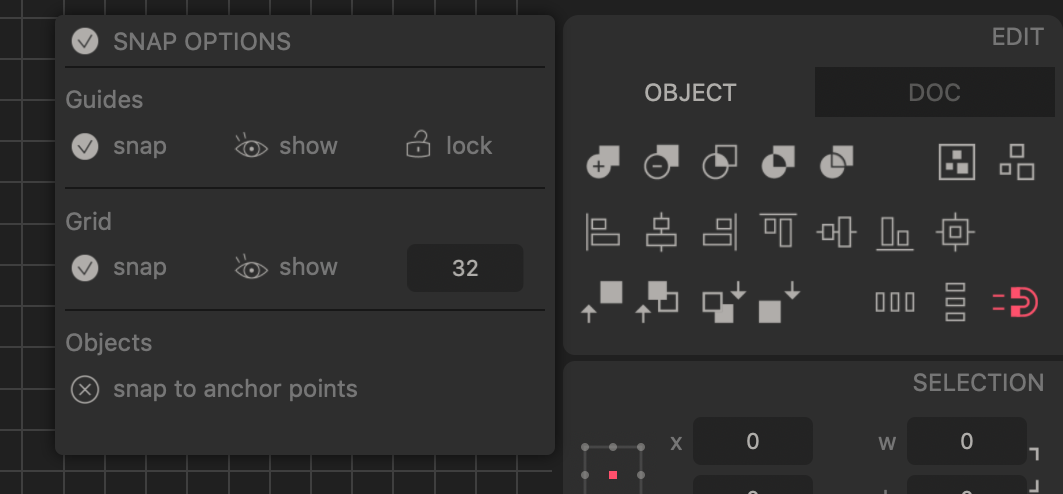
When you move an element you may want to limit this movement in some way. The snap button can limit the position of elements to a grid. Click on the snap button in the OBJECT panel if you want to customize the options. In the snap panel you can limit the movement of guides and elements, and create a customized grid for the document.
4.6. GUIDES
Under construction.